I think this is pretty cool. You could live above your own little shop.

Monday, October 21, 2013
A Village and Salvage Market - The Mountain Video
I think this is pretty cool. You could live above your own little shop.
Wednesday, October 2, 2013
Barn Loft Guest Apt - Collage

This a collage of the studio apt we built in the loft of our barn. It's just one part of a whole 'off-grid backyard retreat' we're working on. We'll be adding a bathroom to the barn and a funky greenhouse/outdoor shower that can use conventional or solar hot water. Someday we plan to build us a tiny sustainable off-grid home, so in the meantime we're learning and trying to become more sustainable here. We've been hit by two hurricanes since we moved here - both times going more than five weeks without power. We'll add a few more tiny cabins/sleeping quarters that use solar and other alternative energy. In the aftermath of another hurricane and power outage we'll move out of the big house, and into our backyard retreat, where we can efficiently generate enough renewable energy to keep our tiny cabins lit, cooled, completely functional with or without city utilities.
I love Pickmoney it's a photo editing site. You can create collages and nice Pinterest pins too. Here's another using the same photos.
Sunday, July 28, 2013
My Ice-Chest A/C For Tent Camping
It's easy to make a cheap air-conditioner for your camping tent. Cut one hole in the top of the cooler to match the size of the small fan you plan to use. Expecting electricity on my trip to Tiny Texas Houses in Luling, I chose this small fan which lay face-down on top of the hole. The air is pushed down, past frozen water bottles or frozen ice packs placed inside, cooling and condensing it as it circulates before being pushed out the 2nd hole you need. Mark carefully around the 'vent' you choose. I used a PVC elbow joint, cut my 2nd hole and pushed the elbow in place, now I can direct the flow of cold air coming out onto me instead of straight up.


Plan A - The Idea
I was anxious to put it together to prove to my skeptical family it would work. They just smiled politely as I explained to them how it would work but said very little. I plan to cut 2 holes in the top of the cooler, one to snugly fit the 4" pvc elbow, and another just a bit smaller to fit this little $8 fan placed face-down over it. The fan will push the air into the ice chest past the frozen water bottles and out the pvc elbow. Only because I knew it was going to be flimsy to transport did I decide to wait till I actually got to my destination to cut the holes and put it all together and I'm glad I did.

Plan B - The Reality
When I arrived with my tent, I couldn't resist the generous offer to spend my week there in a tiny house, even if it meant having no electricity to run my fan. Luckily I had decided to wait until I got there to actually make the thing because I simply cut a much smaller hole to fit the little battery powered personal fan I had brought with me as well. It worked like a charm! I saved the piece I cut out for the elbow, and kept it to plug the pipe and saving my ice when I wasn't running it.
When I got home and used my electric fan it worked even better.
When I got home and used my electric fan it worked even better.
Plan C
I'm planning to build another one using this old ice chest. I'll add some baffles to ensure the coldest air gets circulated well before exiting the vent. At first I planned to place 2 of these 4" elbow vents on this one, but having had a discussion at TTH I now realize I need more air to come in than can come out to further condense and cool the air. I may place two much smaller elbow vents on this one. Thank's guy's! So that's the plan... I'll update with the reality soon....

Sunday, July 14, 2013
The Essay House at Tiny Texas Houses
It felt strange to pack my truck for a week-long workshop at Tiny Texas Houses. It was the first time I've been anywhere alone in a long time. I looked forward to attending the building-with-salvage workshop in Luling by Tiny Texas Houses and also some time just for me.

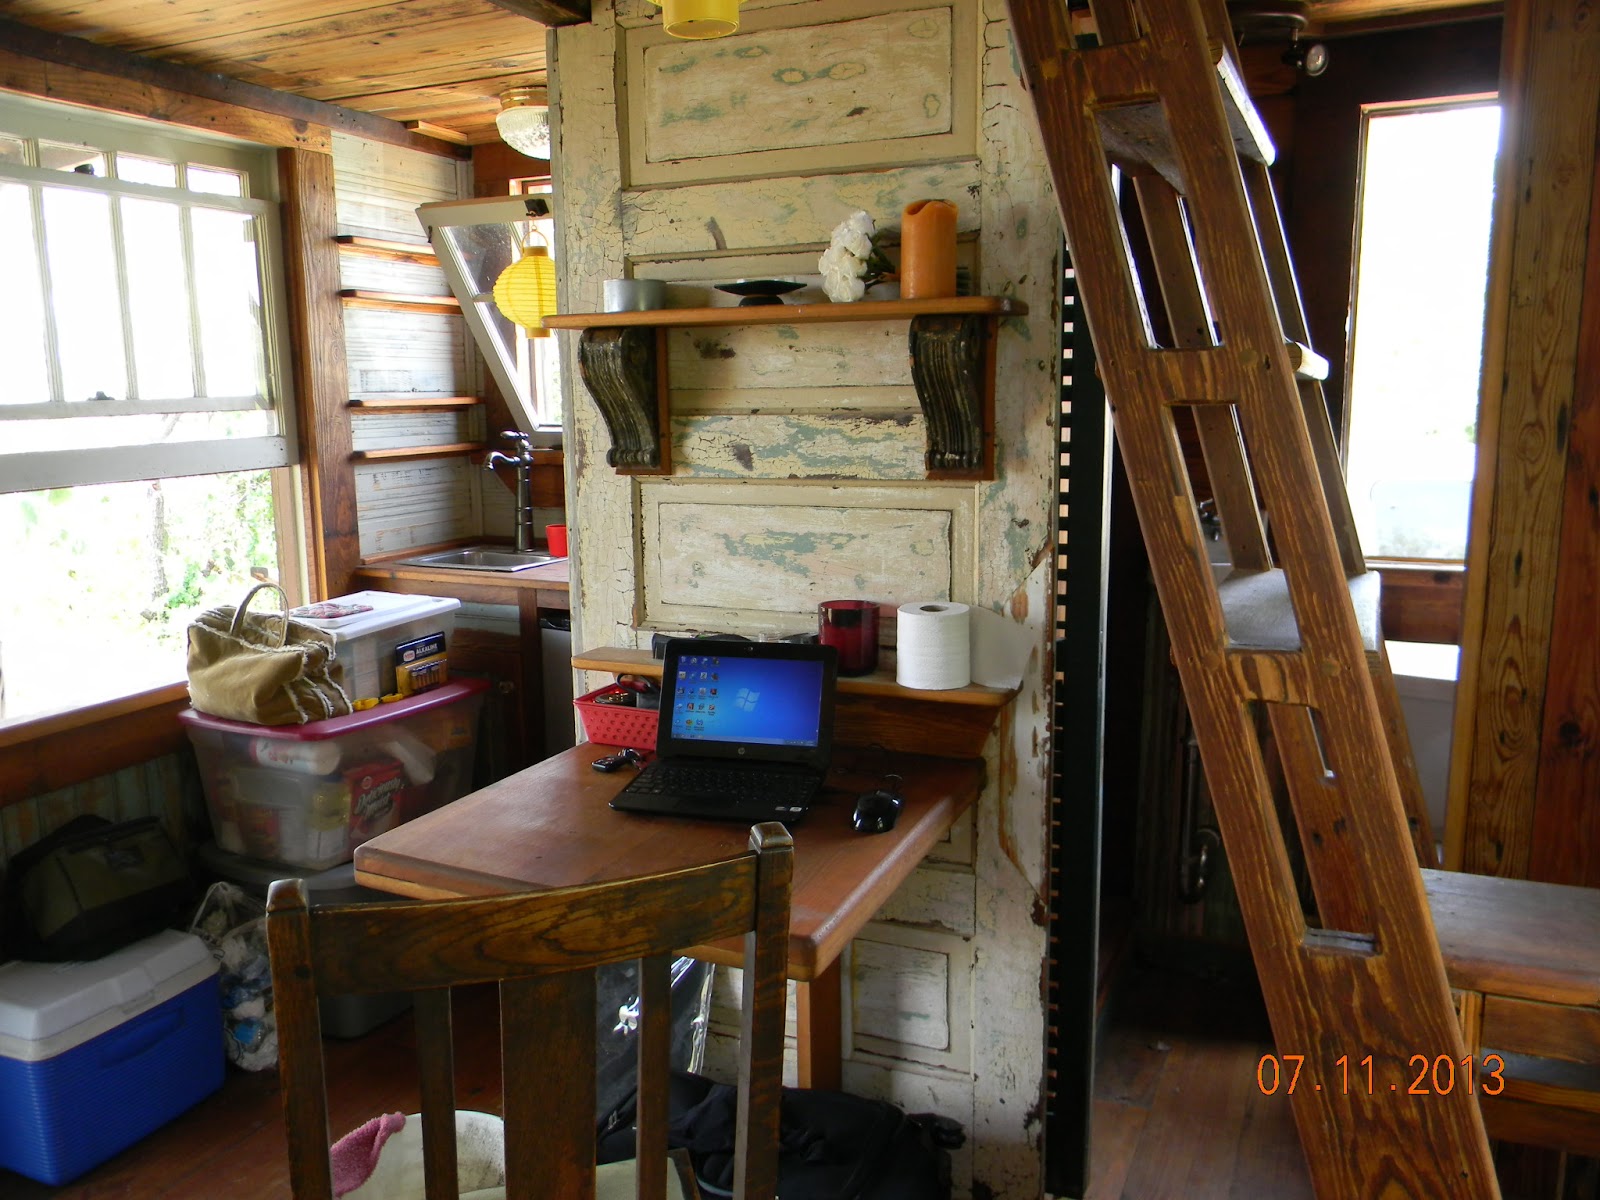
Though I packed my tent prepared to camp, Brad offered me the little writer's cabin they call the Essay House for my stay. It's a sweet little cabin in the back and like all his tiny houses - it's built with love and 99% pure salvage.

 The cabin has no electricity or water right now, though it's fully equipped for it when it finds it's final resting place. I enjoyed sitting and napping on the porch. It feels especially remote tucked in among the Prickly Pear Cactus and Mesquite trees, shrouded in morning fog.
 A ladder leads up to the loft and bed. Everything you could need packed into a tiny space that still managed plenty of room to move around.
 It has a kitchen and a drop down table for writing or meals.
 A shower and a tiny sink of course. There's a shuttered pocket door to hide the the bathroom while still allowing a sweet cross breeze thru the house.
It was very easy to imagine living in this tiny house. A simple life unburdened by all the non-essential 'crap'. A home like this would beg you spend time outside too.

Though I packed my tent prepared to camp, Brad offered me the little writer's cabin they call the Essay House for my stay. It's a sweet little cabin in the back and like all his tiny houses - it's built with love and 99% pure salvage.

I woke that first morning imagining this is what it must have felt like to be a settler on the Texas frontier. A fog had rolled in during the night, I could just make out the faint shape of deer taking advantage of the cover the fog offered.


It was very easy to imagine living in this tiny house. A simple life unburdened by all the non-essential 'crap'. A home like this would beg you spend time outside too.
Thursday, June 27, 2013
'Little Red' - 8'x16' Cabin
Here's s another version of an 8'x10' cabin that fit's Tiny Texas House' newest "Loopholer" design. I finally figured out how to get the arched roof on this one, not exactly right yet but close. The total height from floor to roof peak is 12' 4". I understand a cabin of this size can be loaded onto a 16' trailer (or even built on it) and transported yourself, without permits. This is only the first phase of a house to be constructed in three phases.
The second phase of construction will be adding a downstairs bedroom wing off one side, and the third phase a larger living area off the other side. What will at first be used as living area in this cabin now, will become a large kitchen and dining area after the next two phases are complete. I need to work on it more, and don't have the actual framing in this model, but I imagine it should be designed and framed up in such way that the windows will become interior doorways to the other sections when complete.


 I made a 'Gypsy Wagon' type roof for the cabin, it gives lots of space in the loft above.


The second phase of construction will be adding a downstairs bedroom wing off one side, and the third phase a larger living area off the other side. What will at first be used as living area in this cabin now, will become a large kitchen and dining area after the next two phases are complete. I need to work on it more, and don't have the actual framing in this model, but I imagine it should be designed and framed up in such way that the windows will become interior doorways to the other sections when complete.
SketchUp Link:

I tried to stay as close as possible to Brad Kittlel's floor plan of his latest 'Loophooler' design.

Just enough room for a small kitchen, full bath, and 10'x8' living area.

The sleeping loft is apx. 8'x8'.


A tiny old fashioned kitchen fits well, but I think I'll forgo the stove, and use a crock-pot, induction plate, and toaster oven in my cabin.

A three piece bathroom fits in the corner.

The arched roof gives the loft a height of just over 5 feet.

Cute platform for a bed, made with wood pallets.
Friday, June 21, 2013
Designs for a Loophole Cabin - 1
If you have Google's free SketchUp program
you can download this 3D file for a virtual 'walk-thru' here:
you can download this 3D file for a virtual 'walk-thru' here:
The idea behind this design is it allows the option to build this house in 3 phases, but livable once the center unit with sleeping loft is complete. The bedroom and living room units could be added later.
I designed these with SketchUp and 'skinned' it with the very rustic materials I have available here now, rusty tin and salvaged barnwood. I should have stopped and got a screenshot of the basic floor plan before I got this far but no doubt this is just the first of many arrangements, styles, and materials. Next time I'll get a screenshot of the floor-plan.

Three rooms with a loft in the middle. NO, those are not skylights! Lol. I cut panels out to see inside.

I added a false 'western' style front to the top mostly because I'm a pioneer at heart, and I struggled to get a rounded roof to overhang properly.... . I gave it a name and added a Texas star just because it needed something. I should have called it Rusty Ranch, maybe the next one.

Monday, February 4, 2013
My 'Hide A Camper' Cabin
I've been toying with the idea of building a false front to disguise a camper trailer to look more like a cabin. I see cheap campers I could gut and remodel if necessary, but they are usually really ugly outside as well. My thinking is a deck and false front would hide the ugly exterior and a covering over the whole thing would resolve any future leaky roof issues and serve as additional 'living' area if I screen it in. I did these drawings using SketchUp from Google, it's free and easier to use than expensive cad programs.


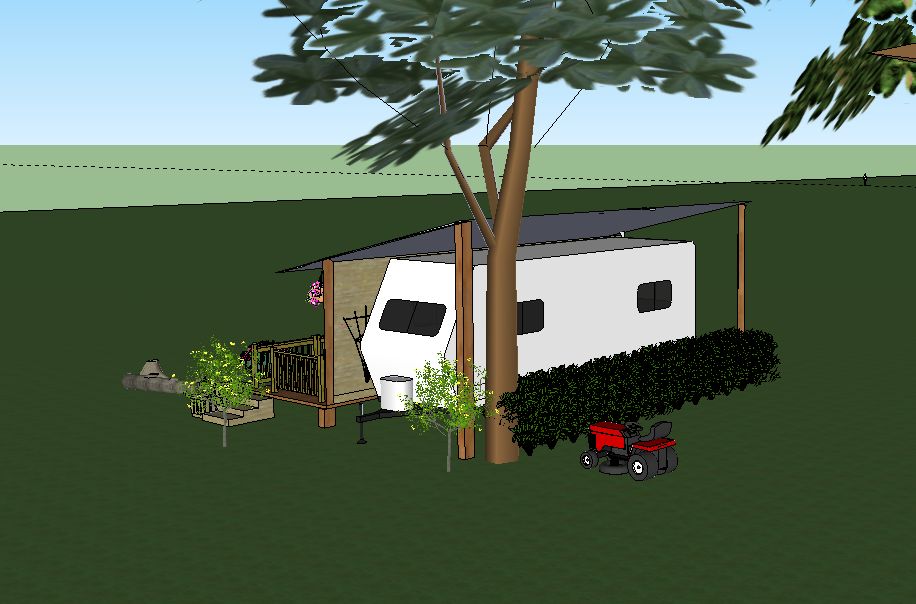

I'm sure there are ways to build something like this to fit most any camper, maybe larger screened windows on the false front? If this were on a vacation property somewhere I could imagine adding a bedroom, maybe even a funky semi-outdoor shower. We could pull a small camper up and basically 'dock' to our little cabin in the woods. Just thinking out loud.....
Subscribe to:
Posts (Atom)